
Making receipts with ExpressExpense is as easy as typing in the receipt information into the receipt template and clicking make receipts. the system does the rest and creates beautiful professional, high-quality receipts for personal or business use. it’s never been easier to create professional-looking receipts with your computer. ExpressExpense also has an iPhone and Android app that will allow you to create receipts from the palm of your hand. these apps are free in the App Store and work with Express Thermal Print app to print receipts directly to real receipt paper using Bluetooth thermal printers.
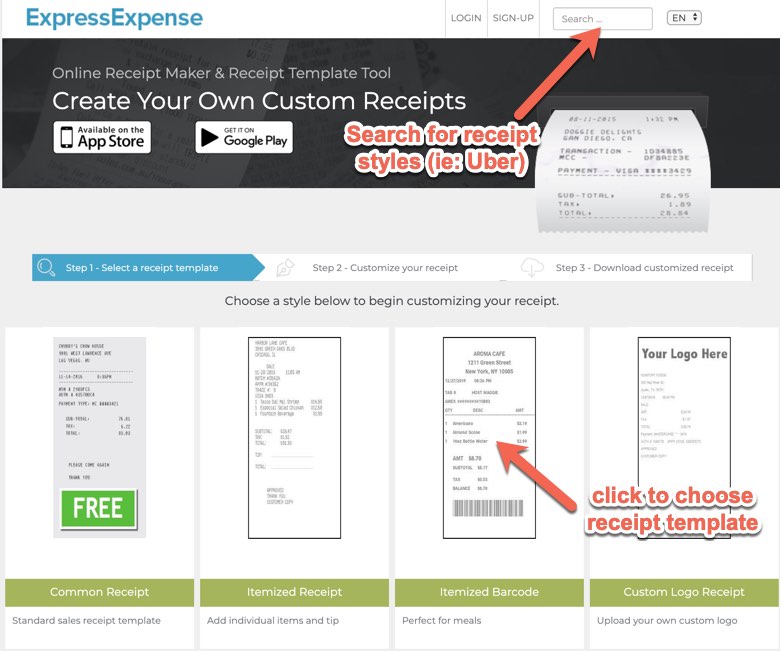
To make your first receipt simply visit ExpressExpense and choose a receipt template from the homepage. There are many different kinds of receipts to choose from including restaurant receipts, Cafe receipt, service receipt, repair receipts, hotel receipts, credit card receipts, lunch receipts, dinner receipts, rent receipts, cash receipts, and the list goes on and on. Pay attention because some of the receipts are itemized and allow you to enter details of each item that was purchased. Other receipts are able to be customized with logos or Graphics. You just need to upload an image and you can have it appear on your receipts. Noticed that receipt logos are converted to a bitmap black and white format to look like what would be printed on a real receipt.

Entering Receipt Basics – Business Information
Once you have chosen the receipt style you’d like to use you’ll be prompted to enter the receipt details. Each receipt has a default font already defined. You can change this font easily from the drop-down menu of fonts. next, enter the date and Time using the drop-down selection tools. if you need to use a 24 hour clock you can do so by clicking the a.m. / p.m. indicator and setting it to blank. Next enter the business name in the field provided. You might have to abbreviate the business slightly because it only is able to display about 40-55 characters due to the narrow width of receipts. now enter the business address you would like to have a pier on the customer receipt followed by the city and state as well as the ZIP code. Note that you can use any of the field inputs to display text on the receipt. For instance you could Utilize the address field for a website address instead of a physical address. It is entirely up to you to customize the receipt to make it exactly as you you would like to see. The next field you’ll see is the currency selection drop down. Express extensive supports many many currencies from around the world. Choose the one that matches the currency your receipt requires. Next to the currency selection is the taxDrop down selector and tax rate input field. Receive can have one or two taxes added to the grand total. You’ll notice you can remove the tax from being added by selecting the none in the tax drop down. You can also choose from other options such as VAT , sales tax, service, tips or other International tax options from the tax drop down. You can then enter the actual tax percentage in the next column and the system will calculate the tax cost based on this percentage. Simply enter 5.5 to have the system calculate a tax of 5.5% of the subtotal. If you would like to add a additional tax item press the green plus icon next to the tax fields.

Receipt Payment and Custom Text Fields
The next field available for input on the receipt generator is the payment field. This can be utilized to enter details about the type of payment – such as “card swipe” or “chip card” or “card present” or “Visa ending in 3922” or “CASH”. we also have a Euro decimal separator option that is available to change the decimal separator from a period “.” to a comma “,”.
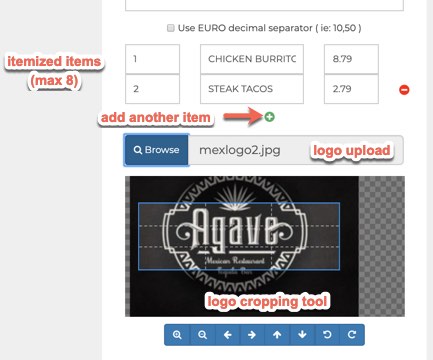
For itemized receipts you’ll see three Fields provided to input details of items purchased. QTY is used to represent the number of items purchased. Item name is used for the description of the item on the receipt. Finally, “price” is used to show the cost of each item. Please note that the system will calculate the total cost by multiplying the (quantity X price) of each item.
Uploading Custom Logo to Receipt Template
Many of the receipts available on ExpressExpense have the ability to have a logo uploaded and place on the generated receipt. this image should be a clear and simple logo or icon without Too Many Colors. PNG, JPEG and GIF File formats are all accepted. After uploading the image, you can crop the image using the image cropping tool which is built into the ExpressExpense receipt system. The image will be converted to a black-and-white format in order to most authentically represent what a generated thermal receipt would look like. If you are having trouble with your image appearing on the receipt, consider converting your image to black-and-white before uploading the image to the receipt maker.